Wednesday, 21 August 2019

How To Find People On Snapchat


If you want to make your Snapchat more interesting by connecting with your more friends or other people, then you need to follow the below-described steps. By following these steps, you can easily find people on Snapchat.

Step 1:
 First of all, open your Snapchat App in your Android Smartphone.
Step 2: After that, login into the Snapchat with your Username or Email Id and Password.

Step 3: After login in Snapchat, the camera feature automatically starts in your Snapchat account.
Step 4: After that, you need to hit the “Profile” icon showing on the left side of the page.

Step 5: After hitting it, Your Snapchat Profile page will open up. You need to tap on the “Add Friends” Bar showing on the first on the list.

Step 6: Now you can find Snapchat people either by their username or by your phone’s address book.
Step 7: You can also search friends on Snapchat through the snap code feature.
Step 8: You can find friends on Snapchat by accepting its privacy policy. For this, you need to hit the “Continue” tab showing on the bottom of the page.

Step 9: After this, A pop-up will appear asking that “Snapchat wants to access your contacts.” You need to select the “Allow” option.

Step 10: Then, A page will come up advising you to “See the friends of your contact who are using Snapchat.” You need to select the “Find Friends” tab.

Step 11: Then, it will again verify your phone number. You can also find Snapchat people through username by searching it in a “search” option showing on the top of the page.
Step 12: After that, you can add People On Snapchat according to the wish list. You will also see many people invite you to accept their Snapchat request on your page.

Tech4service Ltd | Computer repair & Network solutions Edmonton
780 264 9262 

Tuesday, 20 August 2019

How to Find Out Who (Or What) Is Accessing Your Gmail


Gmail is the most popular email service and we all use it as an official and personal purpose. Your Gmail account may be compromised & have unauthorized access of any third person and you might be not aware of this. So, How we can find out that our Gmail account is accessed by another person or not?
our Gmail account may be hacked or compromised due to your fault also, like: if you have authorized third party addon or services to access our Gmail Account OR accessed our Gmail account from others PC etc.  Here you will get 3 ways through which you can know Whether your Gmail account is still safe or not. Let’s check out:

 How to Find Out Who (Or What) Is Accessing Your Gmail

Let’s see 3 ways you can find out if anybody is accessing your Gmail account or not.
1.   Track Last Activity Details of your Gmail Account
2.   Find out Which People Access to Your Gmail Account
3.   Find out Third-party Application has access to your Gmail Account

#1. Track Last Account Activity Details of your Gmail Account

You can get the details from where your Gmail account is accessed in past few days. Gmail gives you this option but most of us don’t know about it. To get your account activity details, follow the steps given below:
Step 1: First login to your Gmail account and on Extreme Right Bottom side, you will get “Last Account Activity” with a link to “Details”.
Step 2: Just Click on “Details” link. A window will pop-up having details of all the past active session of your Gmail Account.

You can easily check the Date, Time & Location, whether it was accessed by other person or not. If it was accessed by others, you can sign out remotely from any device. 

#2. Find out Which People Access to Your Gmail Account

In Gmail, you can delegate your Gmail account to another account. That means you can grant access to another person to handle your Gmail account on your behalf.
For security measure, we should keep checking if anyone is having the access to your Gmail account or not. 
To find out, Just head to Gmail Settings and in ‘Accounts and import’ Tab, you will get all email address to which access has been granted. Read Step by Step Full Guide:

#3. Find out Which Third-party Application has access to your Gmail Account

In case you are any Gmail Addon like Deskun, Snapmail or Boomerang for extra features then you must have authorized these addon or application to access your Gmail account. If you are no longer using these services, it’s better to revoke access from them.
You can get the list of all authorized apps/applications with your Gmail account and remove or revoke access from them. Read Here detailed article:

Using these ways you can check and easily remove others access from your Gmail account

Recover Files From Virus Infected Pen Drive Using CMD


Have you ever lost your data on Hard Disk, Memory Card or USB Device (Pen Drive) etc. due to some Virus attack??? This sudden loss of your important data may hamper your work & affect your work in some way if you don’t know the way, how to recover files/data infected with Virus

There are various recovery tools available to get back the hidden or lost files, like EaseUS data recovery software or much more. But, Here, we will discuss the basic solution to get back your data without downloading or using any third party tool or software.
YES, by using “Command Prompt” on your system, you can also recover the files hidden/lost infected with Virus.  This method is very easy & very handy and can perform immediately.

Step 1. First Connect your Storage Device (Hard Disk, Memory Card, USB Drive) with your system.
Step 2. Here we will recover hidden files from a USB Drive having Drive Name (J:).
Step 3. To open Command Prompt: (i) Go to “Windows key + R”  and type “CMD”  or (ii) Click on Start Button, type “Command Prompt” and open it.
Step 4.  A window of Command Prompt will be open. Now, enter the command :
“ATTRIB -A -R -S -H /S /D  Drive_Letter:/*.* “
Here: Drive letter is “J:” so the command would be:
“ATTRIB -A -R -S -H /S /D  J:/*.* “
Step 5. Now, It will take time according to the size of your drive. So, just wait few minutes, it will show you the all the files/data which was hidden due to the virus.

780 264 9262

How To Block Certain Words in Google Chrome:


On the Left Pan, Go to 2nd Tab “Blocked Words”. Here You will get an option to create a Custom List by adding specific Words. Just slide the Cog icon to enable it. On the Right Side, a prepared list of “Adult Related” words is also given. Just “Slide Cog Icon” to enable it. If you want you to add more words in this list, Just Enter the word and click on “Add Word” button. You would also like to know One Click Trick” to Sign Out Gmail Remotely From All Device

“Block Site” Third Party Tool makes our work easie. Just Use it & Enjoy 


How To Block A Website on Mac or Windows 10


Google Chrome Browser is mostly being used Worldwide. So, Here we will tell you to block websites in Chrome Browser with a third party Extension: Block Site. Apart from the Blocking of websites, this extension also allows you to block specific Word in URL or in the search query of the search engine like: Google

Step 1: First Download & Install Block Site Google Chrome Extension. Now, go to Block List icon on the URL Bar –> click on “Options”. In the Left Pan, Go To “Blocked Sites” and Enter “URL of any Web-page or Website” –> Click on “Add Page”. That’s it !!!
Step 2: In the Left Pan, Go To “Blocked Sites” and Enter URL of any Web-page or Website in the “List of Blocked Site” field –> Click on “Add Page”. That’s it !!!
Step 3: Another simple way to block Website is by right-clicking on the Web-page –> Go to “Block Site” –> “Add Current Site to Black List”.
You can change the By default “BlockSite” page as shown in Image no. 4of below GIF Image. You have to just add the URL of the page that will be shown every time a Blocked website will be opened.
https://tech4service.ca

. Find Network Security Key With Admin Access


1.   Step 1: On the Taskbar, right click on the WiFi tray icon –> click on “open share and networking center”.
2.   Step 2: A window will get Pop Up, In “View Active Network”, you will get the currently connected networks with your Windows OS. Just click on your “WiFi Connection”“WiFi Status” Window will open.
3.   Step 3: Here, Click on “Wireless Properties” –> Select “Security” Tab–> in “Network Security Key”, you can see the password by just selecting box “Show Characters”.
4.   


5.     


6.   2. Find Network Security Key Without Admin Access 
7.   We can view the WiFi password without admin access with the help of “Command Prompt”. Just check out:
8.   Step 1: To open Command Prompt, use shortcut key “Windows Key + R”and type “cmd” in Run Window.
9.   Step 2: Now, just type the below command to get the list of all network which has been connected.
10. “netsh wlan show profile”
11.                Step 3: Now, For which network, you want to know the security key, use that profile name in the below command.For Example Profile Name “Mashnol”, the command will be as:
12. netsh wlan show profile name=”Mashnol” key=clear
13.                Just Enter and you will get all the properties and information regarding this profile or network. In Security Settings, you can see “Key Content”,this is the password of the selected network/profile, as shown in the GIF Image shown below:
14.                

 https://tech4service.ca

15.                In this fashion, you can find network security key of all the network along with the currently connected network. Just select the profile and get the security key.

Set Automatic Shutdown Timer in Windows 10/8/7


To set automatic shutdown timer, you don’t require to download any extra software/tool. This can easily be done from Run Command Window, Commandprompt and also by using Windows Task Scheduler. Steps are pretty simple and straightforward; anyone non-technical person can also do it. Just follow the step by step guide as given below for 3 methods:

Method 1: Using Run Command Window

In method 1 and method 2, we gonna use a simple command to shutdown our system after a specific period of time.
Just open Run Command Window by pressing ‘Windows key+r’ and type ‘shutdown -s -t 3600’ and press ‘Enter’. Here ‘3600’ is the time in ‘seconds’. A message will pop up that Windows will automatic shutdown after the set specific time.


Cancel the Set Timer:
To cancel the set timer, again open ‘run command window‘ and type command: ‘shutdown -a‘. You will get instantly a message that your scheduled shutdown has been cancelled.

Method 2: Using Command Prompt:

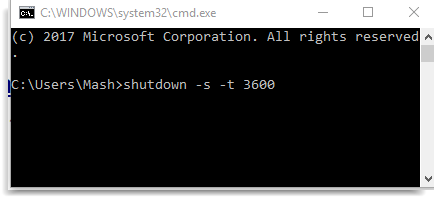
Similar to the method 1, explained above, we also going to use the same command in Commandprompt‘.
To open command-prompt, Go to Start Menu and search for ‘Command Prompt’ OR directly open run window and type ‘CMD.’ Now type the same command: ‘shutdown -s -t 3600’ and press enter.
A message will also pop up that Windows will automatic shutdown after the set specific time, as shown above.

Cancel the Set Timer

To cancel the set timer, again open ‘command prompt‘ and type command: ‘shutdown -a‘ and press enter. You will get instantly a message that your scheduled shutdown has been cancelled, as shown above.